实名认证
实名认证
 未实名
未实名
 已实名
已实名
 订单记录
订单记录 退出登录
退出登录
小程序笔记篇
发布时间:2019-01-15

小程序当中的api使用
服务器api调用的类型:
RESTFull API 返回的是 json
SOAP XML 返回的是 XML
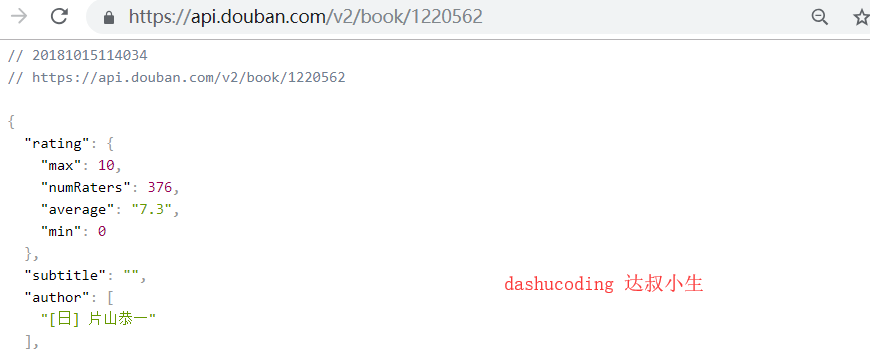
使用豆瓣的api接口:
https://api.douban.com/v2/book/1220562
onLoad: function(event){
 wx.request({
  url: 'https://api.douban.com/v2/movie/top250',
  data: {},
  method: 'GET',
  head: {
   "Content-Type": " "
  }
  success: function(res){
   console.log(res)
  },
  fail: function(){
   console.log("failed")
  },
  complete: function(){
   // complete
  }
 )}
}
豆瓣top250的数据https://api.douban.com/v2/movie/top250

点击二选一:
<block wx:for="{{stars}}" wx:for-item="i">
 <image wx:if="{{i}}" src=" ... "></image>
 <image wx:else src=" ... "></image>
</block>
实现上滑加载更多
<import src="../movie/movie-template.wxml"/>
<scroll-view class="grid-container" scroll-y="true" scroll-x="false" bindscrolltolower="onScrollLower">
 <block: wx:for="{{movies}}" wx:for-item="movie">
  <view class="single-view-container">
   <template is = "movieTemplate" data="{{...movie}}"/>
  </view>
 </block>
</scroll-view>
.grid-container{
 height: 1300rpx;
 margin: 40rpx 0 40rpx 6rpx;
}
onScrollLower: function(event){
 console.log("加载更多");
}
业务中数据的分离到单独的数据文件中
使用require方法,用来加载js模块文件
如:
var a = "dashucoding"
module .exports = {
 postList: local_database,
 a_key: a
}
然后在要加载的js文件中添加插入方法:
js用绝对路径
var postsData = require('../../dashu/dashu.js')
原先:
Page({
 data:{
  date: "one",
  titlle: "...";
 },
 onLoad:function(options){
  this.setData({
   // 改为postsData
   dashu: postsData
  )};
 }
)}
Page({
 data:{
 },
 onLoad:function(options){
  this.data.postList = postsData.postList
  // 已经失效了
 }
)}
导入
wxml
统一用:this.setData
template模板的使用
<template name="postItem">
 ...
 // 模板
</template>
模板的引入:
<import src="dashu/dashu.wxml" />
<block wx:for="{{postList}}" wx:for-item="item" wx:for-index="idx">
<template is="postItem" data="{{item}}" />
</block>
静态使用模板template进行分析优化
<import src="../movie/movie.wxml" />
<template name="dashu">
 ...
 <template is="dashucoding"/>
</template>
导入
css
@import "dashu/dashu.wxss";
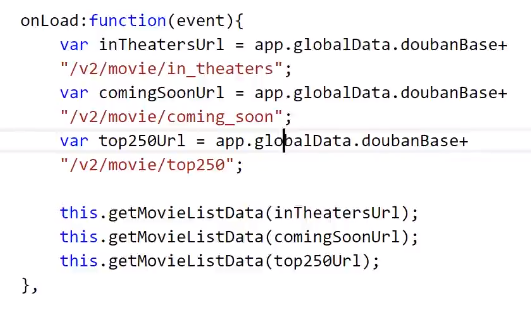
API
豆瓣api:
App({
    globalData:{
        doubanBase: "http://t.yushu.im"
    }
})
Banner轮播图跳转文章详情
<view>
    <swiper catchtap="onSwiperTap" vertical="{{false}}" indicator-dots="true" autoplay="true" interval="5000">
        <swiper-item>
            <image id="7" src="..." data-postId="3"></image>
        </swiper-item>
        <swiper-item>
            <image src="..." data-postId="4"></image>
        </swiper-item>
        <swiper-item>
            <image src="..." data-postId="5"></image>
        </swiper-item>
    </swiper>

    <block wx:for="{{postList}}" wx:for-item="item" wx:for-index="idx">
        <view catchtap="onPostTap" data-postId="{{item.postId}}">
             <template is="postItem" data="{{...item}}"/>
        </view>
</block>
</view>
// 点击详情页面
  onPostTap: function (event) {
    var postId = event.currentTarget.dataset.postid;
    wx.navigateTo({
      url: "post-detail/post-detail?id=" + postId
    })
  }
  onSwiperTap: function (event) {
    // target 和 currentTarget
    // target 指的是 当前点击的组件
    // currentTarget 指的是 事件捕获的组件
    // target 指的是image
    // currentTarget 指的是swiper
    var postId = event.target.dataset.postid;
    wx.navigateTo({
      url: "post-detail/post-detail?id=" + postId
    })
  }
注意比较
Page({
 onTap: function(event){
  wx.navigateTo({
   url: "../posts/post"
  )};
  wx.redirectTo({
   url: "../posts/post"
  )};
 }
)}
navigateTo用于保留当前页面,跳转到应用内的某个页面.在tab选项卡中使用的跳转方法是wx.switchTab,如果跳转到不带 tab的选项卡的页面时,用的是redirect或者navigate.
redirectTo用于关闭当前页面,跳转到应用内的某个页面.会导致tabBar消失.
tabBar

代码:
<template name="dashu">
 <view class="stars-container">
  ...
  <view class="stars">
  </view>
 </view>
 <text>8.0</text>
</template>
星星:
.stars {
 display: flex;
 flex-direction: row;
 height: 17px;
 margin-right: 24rpx;
 margin-top: 6rpx;
}

.stars image {
 padding-left: 3rpx;
 ...;
}
右外边距: margin-right
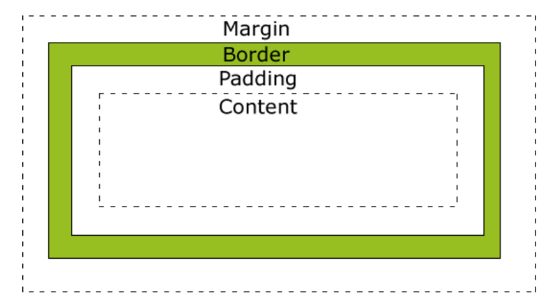
外边距(margin)、边框(border)、内边距(padding)以及最中间的内容(content)
// css
@import "stars/stars-template.wxss";
<import src="....wxml" />
<template name="movieListTemplate">
  <view class="movie-list-container">
    <view class="inner-container">
      <view class="movie-head">
        <text class="slogan">{{...}}</text>
        <view catchtap="onMoreTap" class="more" data-category="{{categoryTitle}}">
        ...
      </view>
    </view>
  </view>
</template>
justify-content:space-between;
justify-content: center;
/* 居中排列 */
justify-content: flex-start;
/* 从行首起始位置开始排列 */
justify-content: flex-end;
/* 从行尾位置开始排列 */
justify-content: space-between;
/* 均匀排列每个元素,首个元素放置于起点,末尾元素放置于终点 */
justify-content: space-around;
/* 均匀排列每个元素,每个元素周围分配相同的空间 */
justify-content: space-evenly;
/* 均匀排列每个元素,每个元素之间的间隔相等 */
align-content属性定义为一个弹性盒子容器.
align-content: flex-start;
/* 从起始点开始放置flex元素 */
align-content: left;
/* 从左边开始放置元素 */
align-content: right;
/* 从右边开始放置元素 */
flex-end:
flex-start

center
space-between
space-around:

space-evenly
stretch
justify-content
div{
 display: flex;
 justify-content: space-around;
}
justify-content: flex-start | flex-end | center | space-between | space-around | initial | inherit;
movie-list template
<import src="../movie.xml"/>
<template name="movieList">
 <view>
  <template is="movieTemplate"/>
 </view>
</template>
@import "../movie/movie-template.wxss";
.movie-list {
 background-color: #fff;
 display: flex;
 flex-direction: column;
}

.movie-head {
 // 上下左右
 padding: 30rpx 20rpx 22rpx;
 display: flex;
 flex-direction: row;
 justify-content: space-around;
}

.more {
 float: right;
}

.more-text {
 vertical-align: middle;
 margin-right: 10rpx;
}

.more-img {
 width: 9rpx;
 height: 16rpx;
 vertical-align: middle;
}
RESTful API简介及调用豆瓣API
// RESTFul API
// SOAP XML
RESTFul API请求的url如下:
https://api.douban.com/v2/book/1220562,返回值为json.
接口的粒度

fail: function(error) {
 console.log(error);
}
<image class="movie-img" src="/images/yourname.jpg"></image>

<import src="../stars/stars-template.wxml"/>
<template name="movie">
 <template is="starsTemplate"/>
</template>

<template name="starsTemlate">
 ...
</template>
function convertToStarsArray(stars){
 var num = stars.toString().substring(0,1);
 var array = [];
 for(var i=1; i<=5; i++){
  if(i<num){
   array.push(1);
  }else{
   array.push(0);
  }
 }
 return array;
}

module.exports={
 convertToStarsArray: convertToStarsArray
}

// 导入js
var util = require('../../utils/util.js')
<template name="stars">
 <view class="stars">
  <block wx:for="{{stars}}" wx:for-item="i">
   <image wx:if="{{i}}" src="/images/icon/star.png"></image>
   <image wx:else src="/images/icon/none-star.png"></image>
  </block>
 </view>
</template>
<template name="movieTemplate">
 <view class="movie-container">
  <image class="movie-img" src="{{coverageUrl}}"></image>
  <text class="movie-title">{{title}}</text>
  <template is="starsTemplate" data="{{stars: stars, score: average}}"/>
 </view>
</template>
更多
<view catchtap="onMoreTap" class="more">
 <text class="more-text">更多</text>
 <image class="more-img" src="/images/icon/arrow-right.png"></image>
</view>
onMoreTap: function(event){
 var category = event.currentTarget.dataset.category;
 wx.navigateTo({
  url: "movie/movie?category=" + category
 })
}
data-category="{{categoryTitle}}"
Page({
 data: {},
 onLoad: function(options){
  var category=options.category;
  console.log(category);
 }
})
动态设置导航标题
// onLoad 页面初始化
wx.setNavigationBarTitle({
 title: '豆瓣Top250',
 success: function(res){
  // success
 }
})
当页面准备完毕执行:
onReady: function(event){
 wx.setNavigationBarTitle({
  title: '豆瓣250',
  success: function(res){
   // success
  }
 })
}
Page({
 data: {
  navigateTitle: "",
 },
 onLoad: function(options){
  var category = options.category;
  this.data.navigateTitle = category;
  var dataUrl = "";
  console.log(category);
  switch(category){
   case "正在热映":
    dataUrl = app.globalData.doubanBase + "";
    break;
   case "即将上映":
    dataUrl = app.globalData.doubanBase + "";
    break;
   case "豆瓣Top250":
    dataUrl = app.globalData.doubanBase + "";
    break;
  }
 },
 onReady: function(event){
  wx.setNavigationBarTitle({
   title: this.data.navigateTitle,
   success: function(res){
    // success
   }
  })
 }
})
var inTheatersUrl = app.globalData.doubanBase + "/v2/movie/in_theaters" + "?start=0&count=3";
var comingSoonUrl = app.globalData.doubanBase + "/v2/movie/coming_soon" + "?start=0&count=3";
var top = app.globalData.doubanBase + "/v2/movie/top" + "?start=0&count=3";
function http(url,callBack){
 wx.request({
  url: url,
  method: 'GET',
  header:{
   "Content-Type": ""
  },
  success: function(res){
   callBack(res.data);
  },
  fail: function(error){
   console.log(error)
  }
 )}
}
module.exports = {
 convertToStarsArray: converToStarsArray,
 http:http
}
movie-grid template
<import src="../movie/movie-template.wxml" />
<template name="movieGridTemplate">
  <view class="grid-container">
    <block wx:for="{{movies}}" wx:for-item="movie">
      <view class="single-view-container">
        <template is="movieTemplate" data="{{...movie}}" />
      </view>
    </block>
  </view>
</template>
实现上滑加载更多数据
<import src="../movie/movie-template.wxml"/>
<template name = "movieGridTemplate">
 <scroll-view class="grid-container" scroll-y="true" scroll-x="false" bindscrolltolower = "onScrollLower">
  <block wx:for="{{movies}}" wx:for-item="movie">
   <view class="single-view-container">
   <template is="movieTemplate" data="{{...movie}}"/>
   </view>
  </block>
 </scroll-view>
</template>
小结
swiper滑块视图属性
| 属性名 | 类型 | 默认值 | 说明 |
|---|---|---|---|
indicator-dots |
Boolean |
false |
是否显示面板指示点 |
autoplay |
Boolean |
false |
是否自动切换 |
current |
Number |
0 |
当前所在页面的index
|
interval |
Number |
5000 |
自动切换时间间隔 |
<swiper>只能放置<swiper-item/>组件
image图片属性
| 属性名 | 类型 | 默认值 | 说明 |
|---|---|---|---|
src |
String |
无 | 图片资源地址 |
mode |
String |
scaleToFill |
图片缩放等 |
往后余生,唯独有你
简书作者:达叔小生
90后帅气小伙,良好的开发习惯;独立思考的能力;主动并且善于沟通
简书博客: https://www.jianshu.com/u/c785ece603d1
结语
- 下面我将继续对 其他知识 深入讲解 ,有兴趣可以继续关注
- 小礼物走一走 or 点赞
热门文章
行业早报2019-01-15 nginx+php 开启PHP错误日志
行业早报2019-01-15
为什么你说了很多遍,对方还是不听? 2018-09-25
行业早报2019-01-15
【Ruby on Rails实战】3.1 宠物之家论坛管理系统介绍
行业早报2019-01-15
从凡人到筑基期的单片机学习之路
行业早报2019-01-15
jmeter单台大数量并发
行业早报2019-01-15
Go在Windows下开发环境搭建
行业早报2019-01-15
ES-科普知识篇
行业早报2019-01-15
Hbase 之 由 Zookeeper Session Expired 引发的 HBASE 思考
行业早报2019-01-15
谷歌大脑专家详解:深度学习可以促成哪些产品突破?
行业早报2019-01-15
EventLoop
相关推荐