实名认证
实名认证
 未实名
未实名
 已实名
已实名
 订单记录
订单记录 退出登录
退出登录
小程序开发实例技巧(三)横向滑动列表加载读取本地json数据
发布时间:2019-01-15

在上一篇文章中我们已经学会了横向滑动切换列表效果的实现,但是我们显示在页面的数据是在js里写死的数据,实际项目中这里一般是请求后台接口返回的数据。我们通过接口给后台传递参数,比如栏目类型,分页大小与页码,搜索人物的关键词等,然后后台给我们返回符合条件的列表,我们把返回的数据展示到前台。
但是有时候我们需要模拟数据时,我们可以自己在本地造一些假数据供我们调试。
第一步:新建一个文件夹存放我们要加载的json数据
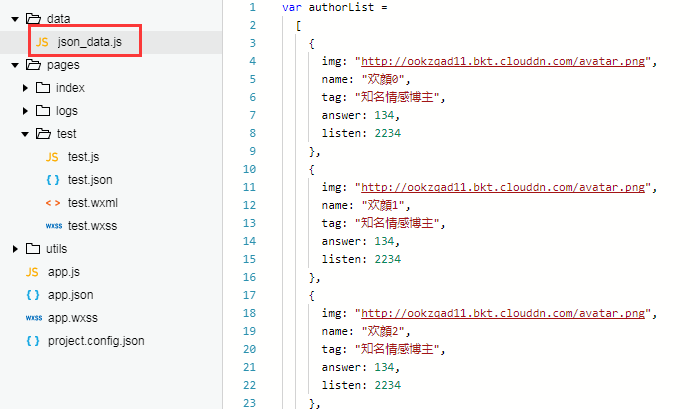
json数组数据如下:
var authorList =
  [
    {
      img: "http://ookzqad11.bkt.clouddn.com/avatar.png",
      name: "欢顔0",
      tag: "知名情感博主",
      answer: 134,
      listen: 2234
    },
    {
      img: "http://ookzqad11.bkt.clouddn.com/avatar.png",
      name: "欢顔1",
      tag: "知名情感博主",
      answer: 134,
      listen: 2234
    },
    {
      img: "http://ookzqad11.bkt.clouddn.com/avatar.png",
      name: "欢顔2",
      tag: "知名情感博主",
      answer: 134,
      listen: 2234
    },
    {
      img: "http://ookzqad11.bkt.clouddn.com/avatar.png",
      name: "欢顔3",
      tag: "知名情感博主",
      answer: 134,
      listen: 2234
    },
    {
      img: "http://ookzqad11.bkt.clouddn.com/avatar.png",
      name: "欢顔4",
      tag: "知名情感博主",
      answer: 134,
      listen: 2234
    },
    {
      img: "http://ookzqad11.bkt.clouddn.com/avatar.png",
      name: "欢顔5",
      tag: "知名情感博主",
      answer: 134,
      listen: 2234
    },
    {
      img: "http://ookzqad11.bkt.clouddn.com/avatar.png",
      name: "欢顔6",
      tag: "知名情感博主",
      answer: 134,
      listen: 2234
    },
    {
      img: "http://ookzqad11.bkt.clouddn.com/avatar.png",
      name: "欢顔7",
      tag: "知名情感博主",
      answer: 134,
      listen: 2234
    },
    {
      img: "http://ookzqad11.bkt.clouddn.com/avatar.png",
      name: "欢顔8",
      tag: "知名情感博主",
      answer: 134,
      listen: 2234
    },
    {
      img: "http://ookzqad11.bkt.clouddn.com/avatar.png",
      name: "欢顔9",
      tag: "知名情感博主",
      answer: 134,
      listen: 2234
    },
  ]
第二步:在json_data.js里导出我们需要的json数据,
/*导出方法 */
module.exports = {
  authorList: authorList
}
第三步:在所需要展示数据页面的js里引入json数据并存到当前页面的变量里
/*引入本地定义的json数据的js*/
var exportData = require("../../data/json_data.js");

Page({
  data: {
    /*将json数据赋值存到本地供页面使用*/
    authorList: exportData.authorList
  }
})
test.js完整代码:
/*引入本地定义的json数据的js*/
var exportData = require("../../data/json_data.js")
var app = getApp();
Page({
  data: {
    winHeight: "",//窗口高度
    currentTab: 0, //预设默认选中的栏目
    scrollLeft: 0, //tab滚动条距离左侧距离
    newsTab: ["健康", "情感", "职场", "育儿", "文学","青葱","科技","达人"],
    /*将json数据赋值存到本地供页面使用*/
    authorList: exportData.authorList
  },
  // 滚动切换标签样式
  switchTab: function (e) {
    this.setData({
      currentTab: e.detail.current
    });
    this.checkCor();
  },
  // 点击tab切换当前页时改变样式
  swichNav: function (e) {
    var cur = e.target.dataset.current;
    if (this.data.currentTab == cur) {
      return false;
    }
    else {
      this.setData({
        currentTab: cur
      })
    }
  },
  //判断当前滚动超过一屏时,设置tab向左滚动。
  checkCor: function () {
    if (this.data.currentTab > 4) {
      this.setData({
        scrollLeft: 300
      })
    } else {
      this.setData({
        scrollLeft: 0
      })
    }
  },
  onLoad: function () {
    var that = this;
    //  高度自适应
    wx.getSystemInfo({
      success: function (res) {
        var clientHeight = res.windowHeight,
          clientWidth = res.windowWidth,
          rpxR = 750 / clientWidth;
        var calc = clientHeight * rpxR - 180;
        that.setData({
          winHeight: calc
        });
      }
    });
  }
})
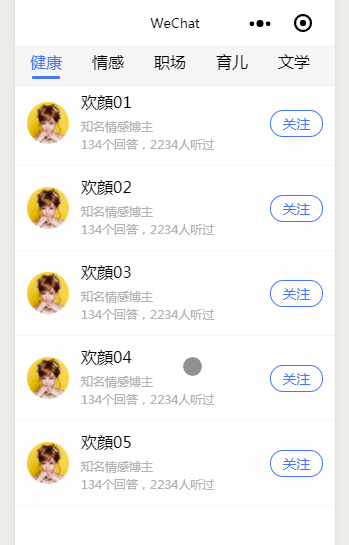
第四步:在页面渲染列表
test.wxml代码:
<view>
  <scroll-view scroll-x="true" class="tab-h" scroll-left="{{scrollLeft}}">
    <block wx:for-items="{{newsTab}}">
      <view data-current="{{index}}" class="tab-item {{currentTab == index ?'active':''}}" bindtap="swichNav" >
        {{item}}
      </view>
    </block>
  </scroll-view>
  <swiper class="tab-content" current="{{currentTab}}" duration="300" bindchange="switchTab" >
    <!--两次for循环嵌套,由于要在第二层里使用第一层循环的对象,所以给第一层循环的对象取别名author,方便后面调用 -->
    <swiper-item wx:for="{{authorList}}" wx:for-item="author">
      <scroll-view scroll-y="true" class="scoll-h">
       <!-- 每一栏目默认展示9条,循环显示9次 -->
        <block wx:for="{{[0,1,2,3,4,5,6,7,8]}}" wx:key="*this">
          <view class="item">
            <view class="img">
              <image src="{{author.img}}"></image>
            </view>
            <view class="author-info">
              <view class="name">{{author.name}}{{index+1}}</view>
              <view class="tag">{{author.tag}}</view>
              <view class="answerHistory">{{author.answer}}个回答,{{author.listen}}人听过 </view>
            </view>
            <navigator url="" class="shouting">关注</navigator>
          </view>
        </block>
      </scroll-view>
    </swiper-item>
  </swiper>
</view>
这里值得注意的是:
两层for循环嵌套,由于要在第二层里使用第一层循环的对象,所以给第一层循环的对象取别名author,方便后面调用
样式表test.wxss代码如下:
.tab-h {
  height: 100rpx;
  width: 100%;
  box-sizing: border-box;
  overflow: hidden;
  line-height: 80rpx;
  background: #f7f7f7;
  font-size: 16px;
  white-space: nowrap;
  position: fixed;
  top: 0;
  left: 0;
  z-index: 99;
}
.tab-item {
  margin: 0 36rpx;
  display: inline-block;
}
.tab-item.active {
  color: #4675f9;
  position: relative;
}
.tab-item.active:after {
  content: "";
  display: block;
  height: 8rpx;
  width: 66rpx;
  background: #4675f9;
  position: absolute;
  bottom: 0;
  left: 5rpx;
  border-radius: 16rpx;
}
.tab-content {
  margin-top: 100rpx;
}
.tab-content .author-info{
  font-size: 12px;
  flex-grow: 3;
  color: #b0b0b0;
  line-height: 1.5em;
}
.tab-content .author-info .name {
  font-size: 16px;
  color: #000;
  margin-bottom: 6px;
}
.item {
  display: flex;
  width: 100%;
  padding: 30rpx;
  justify-content: space-between;
  align-items: center;
  box-sizing: border-box;
  border-bottom: 1px solid #f2f2f2;
}
.img {
  width: 100rpx;
  height: 100rpx;
  position: relative;
  padding-right: 30rpx;
}
.img image {
  width: 100%;
  height: 100%;
}
.shouting {
  width: 120rpx;
  height: 60rpx;
  line-height: 60rpx;
  text-align: center;
  font-size: 14px;
  border-radius: 60rpx;
  border: 1px solid #4675f9;
  color: #4675f9;
}
.scoll-h {
  height: 100%;
}
原文作者技术博客:https://www.jianshu.com/u/ac4daaeecdfe
95后前端妹子一枚,爱阅读,爱交友,将工作中遇到的问题记录在这里,希望给每一个看到的你能带来一点帮助。
欢迎留言交流。
热门文章
行业早报2019-01-15 nginx+php 开启PHP错误日志
行业早报2019-01-15
为什么你说了很多遍,对方还是不听? 2018-09-25
行业早报2019-01-15
【Ruby on Rails实战】3.1 宠物之家论坛管理系统介绍
行业早报2019-01-15
从凡人到筑基期的单片机学习之路
行业早报2019-01-15
jmeter单台大数量并发
行业早报2019-01-15
Go在Windows下开发环境搭建
行业早报2019-01-15
ES-科普知识篇
行业早报2019-01-15
Hbase 之 由 Zookeeper Session Expired 引发的 HBASE 思考
行业早报2019-01-15
谷歌大脑专家详解:深度学习可以促成哪些产品突破?
行业早报2019-01-15
EventLoop
相关推荐