实名认证
实名认证
 未实名
未实名
 已实名
已实名
 订单记录
订单记录 退出登录
退出登录
Python 3 爬虫学习笔记 (五)
发布时间:2018-07-04
这是我自己在学习python 3爬虫时的小笔记,做备忘用,难免会有一些错误和疏漏,望指正~~~
Python 3 爬虫学习笔记 (一)
Python 3 爬虫学习笔记 (二)
Python 3 爬虫学习笔记 (三)
Python 3 爬虫学习笔记 (四)
Python 3 爬虫学习笔记 (六)
六、Scrapy初体验
之前大概学习了下通过urllib和Beautiful Soup 进行简单数据爬取的流程,但是那只适用于一些简单的、数据量比较小的爬虫项目,如果需要爬取的数据量比较大的话,之前的方法必定非常缓慢,所以就有了Scrapy,Scrapy是一个快速的web抓取框架,可抓取web站点并从页面中提取结构化的数据。Scrapy给我们提供了许多的爬虫基类,我们可以直接继承使用,当然,既然Scrapy是一个框架,我们也可以根据自己的需要对它进行修改,下面我们就慢慢来看Scrapy的使用。
Scrapy is an application framework for crawling web sites and extracting structured data which can be used for a wide range of useful applications, like data mining, information processing or historical archival.
Even though Scrapy was originally designed for web scraping, it can also be used to extract data using APIs (such as Amazon Associates Web Services ) or as a general purpose web crawler.
(一)安装(Windows)
Scrapy是纯Python编写的,所以需要一些比较重要的的Python依赖包:
- lxml, an efficient XML and HTML parser
- parsel, an HTML/XML data extraction library written on top of lxml,
- w3lib, a multi-purpose helper for dealing with URLs and web page encodings
- twisted, an asynchronous networking framework
- cryptography and pyOpenSSL, to deal with various network-level security needs
看着依赖包比较多,其实安装起来并不复杂,以管理员的身份运行Windows命令提示符,在以安装Python的前提下,运行:
pip install scrapy
pip会自动下载相关依赖包,如果顺利的话,会直接安装完成。
要注意的是,确认一下python的版本,pip会根据系统自动安装相关包,即如果系统是64位的,pip就会安装64位的包,但是twisted的版本一定要和python的一样,如果操作系统是64位的,python是32位的,pip直接安装的twisted安装就会出错。
如果pip安装twisted时出错,在命令行输入python,查看本地python版本,然后到这里下载和python版本相同的whl文件,使用pip install xxx.whl安装,完成后再执行一遍pip install scrapy即可。
在命令行输入scrapy, 若不报错,则安装完成。
(二) 第一个Scrapy项目
照例,先上官方文档 1.3,找了一下网上翻译的文档都是0.24或者0.24版,所以建议大家还是看官方最新的英文版比较好。
打开命令提示符,进入想要创建项目的目录,运行
scrapy startproject scrapyTest
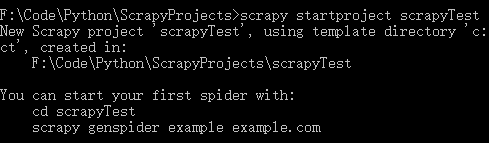
项目创建完成,让我们来看一下项目结构,执行:
tree /f
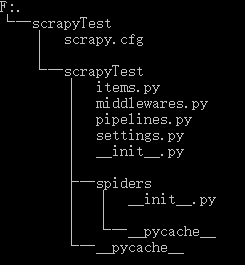
└─scrapyTest
    │  scrapy.cfg           # 配置文件(deploy configuration file)
    │
    └─scrapyTest
        │  items.py         # 项目中的item文件(project items definition file)
        │  middlewares.py   # 中间件
        │  pipelines.py     # 项目中的管道文件(project pipelines file)
        │  settings.py      # 项目中的设置文件(project settings file)
        │  __init__.py
        │
        ├─spiders           # 存放爬虫的文件夹(a directory where you'll later put your spiders)
        │  │  __init__.py
        │  │
        │  └─__pycache__
        └─__pycache__
进入spiders目录,新建test_spider.py如下:
# -*- coding:utf-8 -*-

import scrapy
from bs4 import BeautifulSoup


class tsSpride(scrapy.Spider):
    name = 'test' # 爬虫的唯一名字,在项目中爬虫名字一定不能重复

    # start_requests() 必须返回一个迭代的Request
    def start_requests(self):
        # 待爬取的URL列表
        urls = ['http://www.jianshu.com/',]
        # 模拟浏览器
        headers = {'User-Agent': 'Mozilla/5.0 (Windows NT 10.0; WOW64) AppleWebKit/537.36 (KHTML, like Gecko) Chrome/55.0.2883.87 Safari/537.36'}
        for url in urls:
            yield scrapy.Request(url=url, headers=headers, callback=self.parse)

    # 处理每个请求的下载响应
    def parse(self, response):
        soup = BeautifulSoup(response.body, 'html.parser')
        titles = soup.find_all('a', 'title')
        for title in titles:
            print(title.string)
在命令行输入
scrapy crawl test
结果如下:

上述代码Scrapy为start_requests 中的每个URL创建了scrapy.Request对象,并将 parse() 方法作为回调函数(callback)赋值给了Request(Scray中parse()为默认回调方法)。
The parse()
method will be called to handle each of the requests for those URLs, even though we haven’t explicitly told Scrapy to do so. This happens because parse()
is Scrapy’s default callback method, which is called for requests without an explicitly assigned callback.
上面代码中用了Beautiful Soup来处理爬下来的数据,而Scrapy也有Selector来处理数据,今天先到这里,下次再用一个具体的小项目来更详细地介绍Scrapy。
热门文章
行业早报2019-01-15 nginx+php 开启PHP错误日志
行业早报2019-01-15
为什么你说了很多遍,对方还是不听? 2018-09-25
行业早报2019-01-15
【Ruby on Rails实战】3.1 宠物之家论坛管理系统介绍
行业早报2019-01-15
从凡人到筑基期的单片机学习之路
行业早报2019-01-15
jmeter单台大数量并发
行业早报2019-01-15
Go在Windows下开发环境搭建
行业早报2019-01-15
ES-科普知识篇
行业早报2019-01-15
Hbase 之 由 Zookeeper Session Expired 引发的 HBASE 思考
行业早报2019-01-15
谷歌大脑专家详解:深度学习可以促成哪些产品突破?
行业早报2019-01-15
EventLoop
相关推荐